Into Space 2
Games You May Like
Into Space 2: Fail Upward Until You Reach Mars
Your first flight in Into Space 2 lasts about fifteen seconds. The engine coughs, the rocket wobbles a few hundred metres off the launch pad, the fuel gauge empties, and you fall back to Earth. That is not a loss — that is the game paying you. Barbarian Games built the sequel to Into Space around the idea that every failed launch buys the part that makes the next one better, and the target this time is Mars.
It is the purest version of the launcher-upgrade genre: a flight that lasts seconds, a workshop where you spend what the flight earned, and an altitude counter that creeps a little higher every single attempt until suddenly you are somewhere you could not have imagined reaching an hour ago.
Two Games Stacked On Top of Each Other
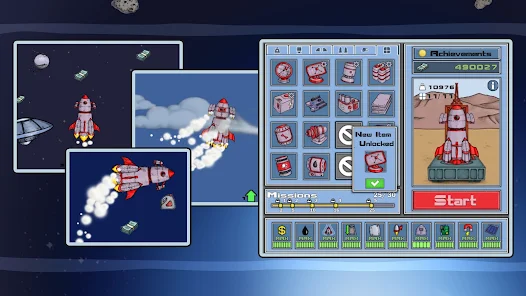
Half of Into Space 2 is a flying game: steering a rocket through a scrolling gauntlet, weaving around hazards, threading pickups, and squeezing the last metre out of a dying tank. The other half is a spreadsheet game: standing in the hangar deciding whether this run’s cash goes into fuel capacity, thrust, hull strength or the radar that stops you flying blind.
Neither half works without the other. Great flying with a bad build stalls out at the same altitude every time; a great build flown carelessly hits an asteroid at 12,000 metres and hands you nothing. The flight ends when your fuel runs dry or your damage tops out, and your payout is calculated from how far you got plus every coin you grabbed on the way.
Controls — Four Keys, and the Interesting One Is "Off"
- ⬆️ W / Up — Boosters. Extra thrust when you need to punch through something or claw back speed.
- ⬅️ A / Left — Turn left. The rocket has real momentum, so steering is a nudge, not a swerve.
- ➡️ D / Right — Turn right. Overcorrecting tips you off vertical, and a rocket flying sideways is a rocket wasting fuel.
- ⬇️ S / Down — Engine off. The most important key in the game. Cutting the engine stops burning fuel, and if you have built up enough speed you will keep coasting upward for free.
That last one is what separates people who reach Mars from people who don’t. Fuel is not a timer you spend as fast as possible — it is a resource you meter out, burning hard when you need acceleration and gliding silently when momentum is already doing the work.
Three Acts: Atmosphere, Space, Mars
The run is split into three genuinely different regions, and each one changes what you are fighting.
- 🌍 Earth’s atmosphere. The longest, meanest stretch and the one that walls you in for most of the game. Air resistance drags on you, wind shoves the nose off vertical, and the sky is busy with things that will damage the hull. Getting out of the atmosphere is the real difficulty curve — most players spend the bulk of their upgrades just solving this stage.
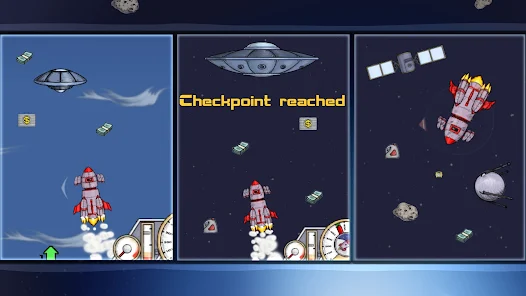
- 🌌 Outer space. The air resistance disappears and coasting suddenly becomes viable, but the hazards get worse: asteroids to dodge and black holes that pull your trajectory apart if you drift too close. This is where the engine-off key earns its keep.
- 🔴 The Martian atmosphere. The victory lap, and shorter than the climb that got you there — players consistently find the Earth-to-space leg far harder than the space-to-mars leg. You still have to arrive with something left in the tank.
Scattered through all three: fuel canisters to top up the tank, repair pickups to patch the hull, coins to bank, and boost gates — rings that hand you a burst of free speed if you can line the rocket up to fly cleanly through them.
The Hangar Is Where the Game Is Actually Played
Between flights you rebuild the rocket. The upgrade tree covers:
- 🔥 Engines — raw thrust, and how efficiently it converts fuel into altitude.
- 🚀 Boosters — the burst you get from the Up key, for punching through a bad patch.
- ⛽ Fuel tanks — more capacity means a longer burn, but also more weight to lift.
- 🕹️ Control systems — how sharply the rocket answers the steering keys. Cheap and hugely underrated, because dodging is free altitude.
- 🛡️ Hull and durability — how many hits you can absorb before the run is cut short.
- 📡 Radar — unlocks later and shows you where fuel and accelerators are ahead. It sounds like a luxury and is closer to a necessity.
Missions Are Minigames, Not Checkboxes
Reaching certain altitudes and velocities unlocks missions, and these are not "collect 20 coins" busywork — they are separate scenarios with their own rules, and they pay real cash. The most useful of them are the speed races, which run on obstacle-free tracks: with nothing in the way to damage you, they are by far the cleanest route to the altitude and velocity achievements that would otherwise take a dozen ordinary flights.
How to Get to Mars Faster
- Learn to coast. Burn hard off the pad to build speed, then cut the engine with S and ride the momentum. Fuel spent maintaining a speed you already have is fuel that does not exist later.
- Buy fuel efficiency before fuel capacity. A bigger tank is heavier. A better engine makes every litre you already carry go further, and it compounds with everything else you own.
- Do not ignore steering. Control upgrades are cheap and turn near-misses into clean passes. Every hazard you dodge is damage you do not have to buy hull to survive.
- Line up the boost gates early. Start correcting your angle well before the ring — the rocket turns slowly, and a gate taken at an angle gives you far less than one taken square.
- Grab fuel even when the tank is nearly full. Detouring for a canister at 8,000 metres costs a second; running dry at 30,000 costs the whole run.
- Farm the speed races for achievement cash. Obstacle-free missions are the safest place to hit velocity and altitude milestones, and the payouts fund the expensive late-tree parts.
- Expect the atmosphere to be the wall. If you are stuck, the answer is almost always thrust and durability, not a bigger tank — the climb out of Earth is a power problem, not an endurance one.
Then one flight goes differently. The atmosphere thins, the drag lets go, the stars come out, and the altimeter just keeps counting.
Hot Games

New Games

